
At BenevolentAI we work with a Kubernetes based infrastructure that is completely containerized.
Using Kubernetes we run many sophisticated workflows for data processing, model training, model serving and metrics and evaluation. For such use cases, Apache Airflow is an excellent tool for programmatically managing the workflows and also exposing a friendly UI.
Note that the content below assumes that you are familiar with the common concepts of Airflow such as an Executor, Operator, DAG, etc. and some common concepts of Kubernetes such as a pod.
One nice thing about Airflow is that it’s extremely configurable and extensible. But it also means that there are usually several ways of doing the same thing. Here are a few examples:
- Both CeleryExecutor and KubernetesExecutor can be used to have a distributed task queue. Which executor is better?
- In order to run a Python script, any one of the BashOperator, PythonOperator, and KubernetesPodOperator can be used depending on how you would like to launch the task. What are the pros and cons?
- How should the DAGs be versioned when it’s changed frequently?
In this post we will try to go through the lessons and best practices we have learned from using Airflow with Kubernetes at Benevolent.
Airflow and Kubernetes
Airflow now offers Operators and Executors for running your workload on a Kubernetes cluster: the KubernetesPodOperator and the KubernetesExecutor.
While a DAG (Directed Acyclic Graph) describes how to run a workflow of tasks, an Airflow Operator defines what gets done by a task. The KubernetesPodOperator works with the Kubernetes Python Client to run a task by launching a pod, which allows the user to have full control over the run-time environment, resources, and security. This is achieved by providing a Docker image and corresponding configurations of the pod.
This has the beneficial side-effect of separating the orchestration logic (which we leave to Airflow) from execution logic (which we leave to Docker images that run in Kubernetes). This separation of logic makes it easier to test, debug, and evolve your system. The snippet below shows an example. In this case, if we want to modify the logic of task_1, we modify the code in benevolent/image, release a new versioned image tag, say v2, and the only thing that needs to be changed in Airflow DAG is the image tag

For BenevolentAI, this is particularly important because we constantly improve our software and regularly manage complex dependencies between microservices. We enforce that all business logic should be implemented in Docker images and launched only with a KubernetesPodOperator rather than using other operators such as the PythonOperator or BashOperator.
Alongside the KubernetesPodOperator, it is also important to have a suitable Executor to execute the task in a dynamic and efficient manner. Airflow Executors decide the way task instances get run. At BenevolentAI, we run long-running and computationally intensive tasks like model training and batch inference every day. But we also run smaller short-lived tasks such as creating a directory or pushing training artifacts to s3, so we need both flexibility and scalability in an Executor. In the end we decided on two executors: the CeleryExecutor and the KubernetesExecutor. Both run distributed tasks, but they differ in the resources they have available and the way in which they utilize those resources to complete a task.
The CeleryExecutor requires you to stand up at least one worker node that gets assigned tasks to execute through a message queue like Redis. Having multiple workers always available makes it scalable because it can deal with increased load by scaling horizontally; it is also flexible because if one of the workers goes down the task can be allocated to another worker. However, this high availability comes with an increased cost because it is difficult to fine tune the number of workers and the CPU/RAM resources that a worker requests based on the specific task it’s executing.
The KubernetesExecutor on the other hand does not require you to stand up these workers in advance, but instead creates a new worker pod for every task instance that needs to be executed. This means that when traffic grows, we can scale up to meet demand by using more resources; and when traffic decreases, we can scale back down to conserve resources. This offers us the flexibility and scalability that we need while improving the utilization of our resources. Additionally, the KubernetesExecutor allows the user to make task-specific configurations on the worker nodes. Recently, we have had success in tuning our Airflow setup to use the new KubernetesExecutor. We have already seen improved utilization of our cluster resources – this has made for some happy Site Reliability Engineers!
Using the KubernetesPodOperator with the KubernetesExecutor, we run cost-friendly and resource efficient Airflow DAGs that dynamically scale and effectively decouple orchestration from execution.
Versioning DAGs
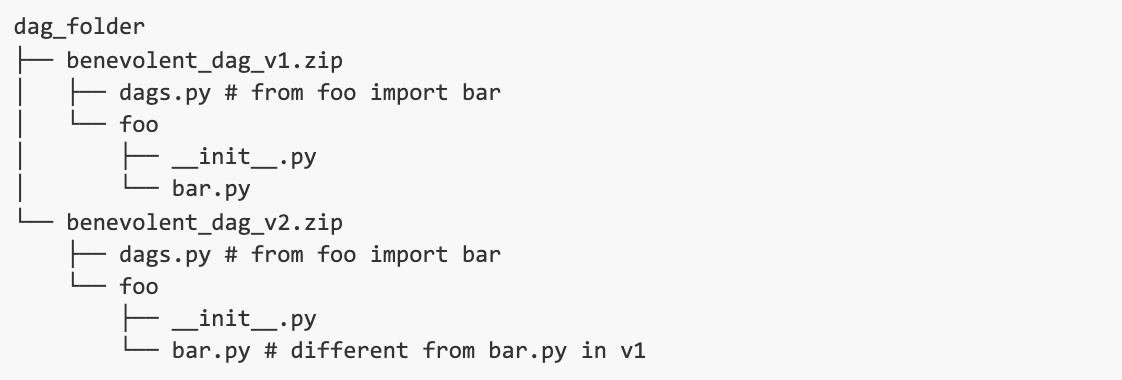
We want to put multiple versions of the same DAG in an Airflow server. Let’s say our DAG is called benevolent_dag. We use the packaged DAG feature to isolate the source code for each version in a zipped file in order to make the DAG folder look clean as shown below.
There are some ways we want the multi-versioned DAGs to behave, for example:
- Updating the DAG code in one version should not affect another version, which might be in running state. When one version of a DAG is in running state, we don’t want the release of a new version to interrupt it.
- We want to re-run an older version of DAG and compare results from different versions of DAGs.
- We want to save compute costs, compared to using separate Airflow deployments for different DAGs.
There is one problem though. Note that in both versions of dags.py we import the bar sub-module from the foo module, but the two bar modules actually have different code despite the same name. The problem is that by default the foo.bar module will only be loaded once. In our case, depending on the order that the DAGs are loaded, either bar.py from v2 will be used by the DAG from v1 or the opposite, which loads the wrong code between versions. This is due to the way that Airflow loads DAGs: it uses Python’s importlib.import_module to load the DAGs as Python modules, in the same process that Airflow webserver or scheduler runs. Because modules are stored in the global variable sys.modules, our module foo.bar would not be loaded again if it already exists in sys.modules, even if it has different code.
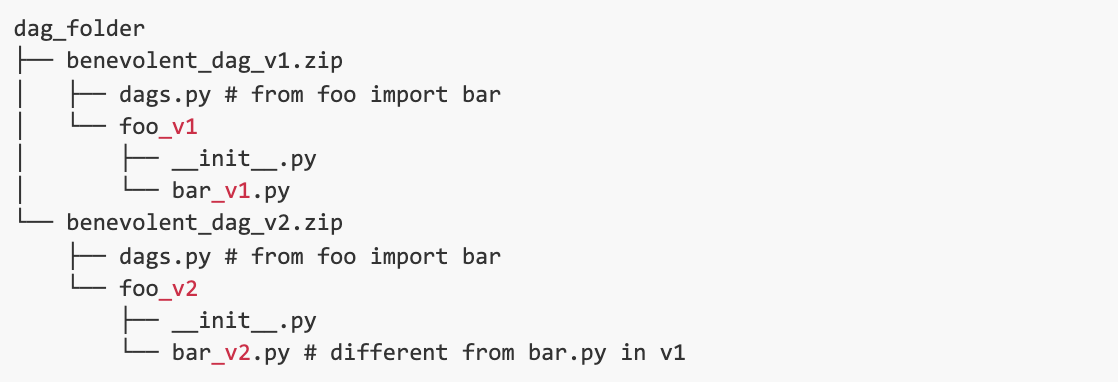
One seemingly apparent solution is to rename the sub-modules so that they are unique across DAGs. For example, versions can be appended to module names as shown below. However, this is not feasible for DAGs with complex dependencies because all the corresponding import statements need to be changed.
Unable to find a more elegant solution, we decided to hack the module loading mechanism to solve the problem. What we want to achieve is that everytime foo.bar is imported, it should load the module that’s local to the current script instead of, if exists, reusing the one in sys.modules that’s loaded from other places. We accomplished this by adding the following code before importing the modules.
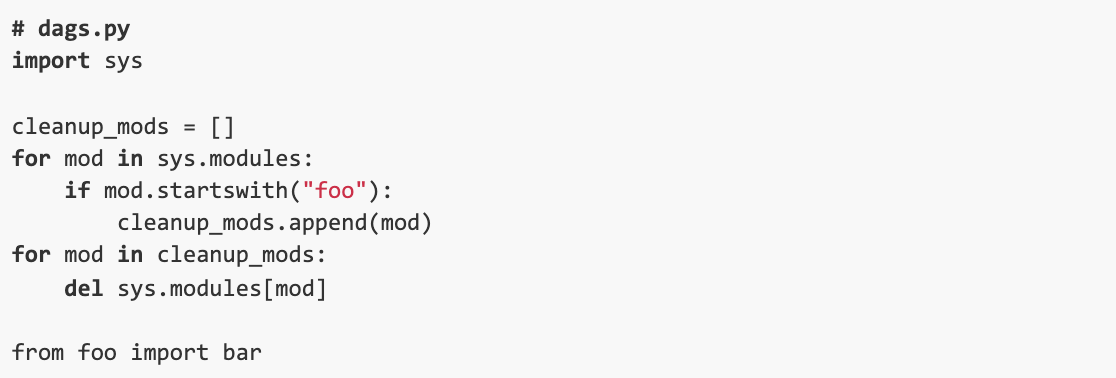
Now we can enjoy the benefits described at the beginning of this section, while waiting for a more elegant and out-of-the-box solution from Airflow 2.0.
How we test it
BashOperator and PythonOperator are probably the two most frequently used operators in Airflow, and they are also the most talked about in articles.

They are convenient and quick, until your tasks have logic that is more complicated than the hello-world examples. The code becomes not testable due to the interleaved execution logic and orchestration logic in the DAG code, which forces developers to mock a running Airflow environment in order to unit test a task.
In the earlier section we talked about separating the orchestration logic from execution logic by using KubernetesPodOperator. This design makes testing easier as well, as shown by our Airflow testing strategy below:
- Execution logic unit testing: unit testing is done within the code repository of each Docker image, just like any other project, and does not involve Airflow at all.
- Orchestration logic unit testing: we can unit test an instance of Airflow operator as suggested by the documentation. Note that at this step the execution logic is treated as dependencies and should be mocked.
- Acceptance testing: for each DAG, we have defined a suite of acceptance tests that use toy input data and actually run through the DAGs from end to end. Any change has to pass the acceptance test in development/staging before releasing to production.
While we can also imagine aspirational test strategies such as mocking transient failures in DAG execution and make sure DAGs are robust enough to recover from failures, we have found the testing strategy above is good enough to keep things running for our needs.
What else have we learned
- Sub-DAG is a handy concept to develop reusable DAG components. However, as of Airflow 1.10, the implementation of sub-DAG using SubDagOperator is not a first class citizen, and using it leads to issues like scheduler deadlock. We’ve also found that the SubDagOperator is not compatible with KubernetesExecutor out of the box. While tricks can be applied to work around the issues, we recommend not using sub-DAG if possible.
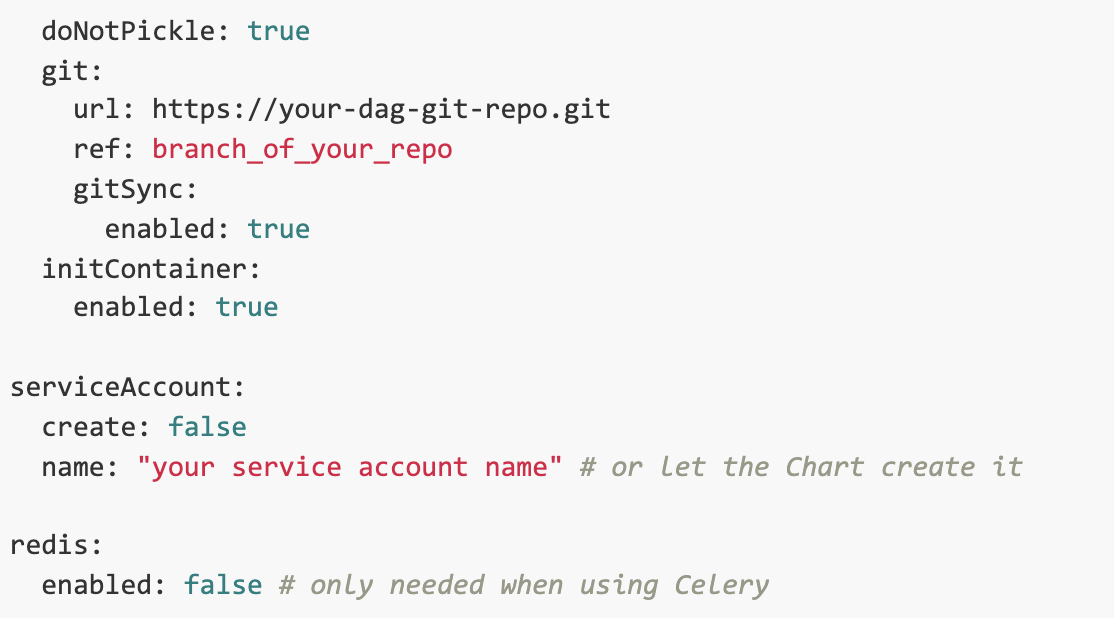
- There are a few ways to release DAGs into Airflow servers, and we found that git-sync is the most convenient for continuously delivering DAGs and updates.
- When deploying Airflow to Kubernetes, it requires persistent storage volumes in order to persist the logs produced by running tasks. However, the volume needs to be mounted by all the worker nodes plus Airflow’s webserver and scheduler, which is tricky when working with storage classes that have more restricted access mode, e.g. ReadWriteOnce. Instead, we enabled the remote logging in order to persist logs in S3 storage.
It’s relatively easy to use the stable/airflow Helm chart to deploy Airflow to Kubernetes. What follows is our example Helm values for the configurations described above.


Back to blog post and videos